Thursday, May 15, 2008

Another Detour

A few folks on the AlfaBB have indicated the presence of "might as wells" when performing suspension work of any kind. You know, "might as well repack the hubs and bearings", or "might as well paint stuff."

Over the past week, I've been distracted with an unplanned "might as well." In this case, it involved the inner fenders.
You see, the inside fenders were coated with lots of dirt, over which a layer of undercoating was sprayed. On top of that, some of the body paint oversprayed into the inner fenders, making things look a bit strange. However, there was no sign or rust or any other nasty/terminal things. To my untrained eye, everything looked functionally OK (if not necessarily pretty.)

Given this, I originally planned leaving the inner fenders alone. But the thought of trying to paint the inner fenders started creeping up on me. And the guys at Group 2 gave me enought pointers that I felt I'd be able to try this without hurting myself too badly.

First, one must clean all the gunk and dirt. Since the car was parked inside my garage, I used a few drip pans, a big bucket of water, a few spray bottles to limit the amount of water getting sprayed all over the garage, as well as a big cleaning brush and tons of paper towels. To clean the inner fenders, I used a degreaser called "Krud Kutter." Since "krud" would be a good description of the stuff facing me, I figured this would be useful. I diluted the degreaser down 5:1, and sprayed it all over the inner fender, scrubbing with the brush and paper towels.

Cleaning the inner fender area exposed the car's original color - which I can't still figure out. The original color is either Rosso Amaranto () or Prugna (Plum Purple). The current car color is Alfa Red; if I ever restore the car, I'll probably go back to the original color - I think it would look great.
(Note: here is an Alfa Bulletin Board post of a much nicer GTV in Rosso Amaranto. )

Cleaning was tedious, messy, wet, and uncomfortable. It took me three nights (1.5 hours per night) to get the fenders clean enough for spraying.

Once clean, I masked a few sections, and coated the inner fenders with Wurth High-Build Underseal (this thing sticks to everything!) Again, the lack of room made spraying very uncomfortable. But with a bit of patience, I was able to spray things OK.

After about 90 minutes, the undercoating had dried enough to remove the masking. Also after 90 minutes, the buzz from all the chemicals started to wear off, too!

So now, the inner fenders look much better - not councours quality, but good enough for daily driver car. And I am hoping the undercoating will help keep rust away for a bit longer.
And again, the guidance from the guys at Group 2 was very dead on - this is something that was doable, and seems to have worked well (so far.)

I left parts of the inner fender without painting, in order to leave the original color exposed. These areas did not look rusty at all - the paint was holding up very well. I figured this way, if/when I repaint this car, I'll be able to match the original paint.

Given the limited space, I am happy with the results. I give myself a C grade - not necessarily great, but passing nonetheless.


Next up: I start putting things back together. Really... I mean it this time... Seriously...

Item C, Revisited.

A few postings ago, I described the process of fixing the suspension as:

a) Take the suspension apart - remove every part from the car.
b) Clean up the parts
c) Replace any non-usable parts with new parts
d) Put it all together.

So, a few weeks back, I ended up buying a set of springs for the car from Group 2 here in Seattle. The folks at Group 2 also sourced a bunch of other parts for me. I figured I'd list some of them here:

- Koni Sport dampers - these things are beautiful

(A note about shocks: again, dampers are one of those things different folks have different opinions about. Unfortunately, in some cases, dicussions about the benefits/drawbacks of specific dampers turn into religious wars, of the sort: "My damper is better than yours." There is a lot of irrational dicussions about dampers out there on the web.

As for me, I'll admit, I probably can't tell the difference between a Koni damper from a stick of crap -- seriously! But for some irrational reason, I like Koni dampers. I can't tell why: maybe it's the name; maybe it's the adjustability; maybe it's the fact that they come from Holland. They are like a safety blanket. Go figure...

I guess I am not immune from irrational sentimentality, either.)

- Bump stops


- Adjustable upper camber arms (the bottom piece.)
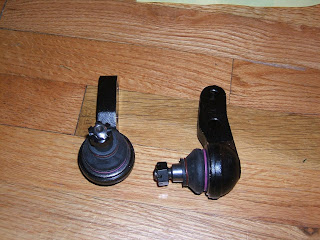
Note: the piece at the top of the photo is the upper caster arm, painted and ready to install. I did replace the ball joint at the far left of the caster arm.

--Ball Joints.


Just looking at all these parts makes me drool.

Saturday, May 10, 2008

Painting

The main reasons behind my work with the suspension are mostly functional: better spring rates to help keep the car from bottoming out; replacing old bushings and ball joints to make sure the suspension is tight and taught.
In order to do all this, pretty much every part of the suspension is removed from the car. With all these parts out, there are a few "you might as wells" lurking out there. One of them has been mentioned: servicing the hubs and bearings, to make sure they all work nicely.

But the big one is re-painting all the various suspension parts. This serves a functional purpose: keeping rust from attacking the suspension parts. Admittedly, this is not the main reason; rather, painting the suspension parts makes the suspension look good.

Repainting the parts involves three major steps:
1. Remove old paint, dirt, junk from parts
2. Paint the parts
3. Inspect and repeat as necessary.

These pictures show some of the parts before cleaning, with all the dirt, old paint, and overspray all over them.


For removing the old paint, I used a few gallons of industrial purple degreaser (shipped in
various brands.) I dilluted it down with water 1:1, to make it a bit easier to handle (i.e. it burns my skin a little less quickly.) Even then, this is nasty stuff - the thing will burn skin, ruin your eyes, kill grass, dissolve aluminum, and do all sorts of nasty things. But it "melts" paint and grease, and is fairly effective at removing paint.

Even then, I still had to use a few metal brushes to scrape paint and rust from the various pieces. This was tedious, messy work. Once done, I sprayed everything with WD-40 to help prevent rust from forming on the bare metal pieces. The pictures here show the parts after cleaning/degreasing, and masked for painting.

Once the weather cooperated, it was time to paint things. I used Brakeleen brake cleaner to remove the WD-40 from the metal pieces. I also used lacquer thinner as a final prep step.

For paint, I used VHT Chassis and Roll Bar Spray Paint (Gloss Black.) This is an epoxy paint, that in theory forms a nice, strong, rust-protecting layer. Initially I used two and a half cans of the stuff. Unfortunately, some of the parts got scraped up (more on that in a future post.) So I had to repaint a few of the pieces.


The results are pretty neat: shiny black parts, some of which look almost new. I'll be honest: this is the first time I've painted anything this involved in my life. Although the color is not perfectly uniform or concours-grade, I am very happy with the results.

Things I would do different if I had to do this again;

a) Find a sandblaster shop, and have all the pieces sandblasted. Again, degreasing/cleaning the parts was time consuming, tedious, and tiring. It took a few weekends for me to do all this. I suspect a sandblasting shop can have these parts shiny-clean in a few days.

b) I would re-consider powder coating rather than painting. The most annoying part of painting these parts was waiting for the proper weather conditions. This spring has been particulary wet and cold, which has stretched the paint job by a few months. I suspect a powdercoat shop could have turned this job around in a week or two.

Doing all the work myself did save me some money, but if I had known how long painting was going to take me, I probably would have had a shop paint/powdercoat all the stuff for me.

Sunday, May 4, 2008

Springs, Part 5 - New Toys.

So, in the last post, I mentioned my adventures with hubs and wheel bearings, and how Group 2 helped me with this. During my visit, I figured I'd ask Joe English, Group 2 proprietor, about springs.

Remember the springs? I removed them quite a few posts ago. Replacing them was one of the main reasons for working on the suspension, remember? I must admit, I have not kept up with springs recently. That ends today.

So, as you may recall from a previous posting, when buying new springs, the two main issues are:
- spring rate
- spring free length.

The main equation that ties all this together is:

k = Fs/(Lf-Lc)

Where:
k = spring rate
Fs = load at spring
Lf = free length of spring
Lc = compressed length

At normal ride height, we measured and figured out:
Fs = 1879 lb
Lc = 8.0315" (204mm)


During my visit to Group 2, I mentioned to Joe that I was looking for a set of springs that would keep the front end from bottoming out during heavy braking (which tends to require stiffer springs) while keeping the road ride quality reasonable (which tends to require softer springs.)

Well, Joe thought that was a good plan, and suggested a set of AR Ricambi Super Sport springs. He felt these springs are a great compromise for the road (not too stiff, not too soft), keep the car much more stable than the stock springs, and helps with the bottoming out issues. He also indicated ride height issues can be fine-tuned by adding shims to the springs; this is something they do all the time at the shop. Joe also indicated they had this spring set in stock.

So, I was curious: what were the spring rates for the AR Ricambi springs? I'd been looking for something in the 600-800 lb/in range. After a bit of digging through his records, he found the front springs are rated at 580 lb/in. These rates are close to the bottom end of my "pulled-from-thin-air" range, so this was very encouraging.

A decision needed to be made: do I go with the AR Ricambi springs, which have been used and tested by countless, more experienced Alfisti before me? Or do I keep spending/wasting time digging for springs shops on the web, hoping to find someone that could custom make springs for my very special needs, pay tons of money, hoping that I alone know better than fellow, more experienced Alfa experts?

So, I went ahead and bought the AR Ricambi springs. Admittedly, this is very out of character for me ("you mean, there are folks out there that know more about this stuff than I do?") Besides, Joe and the folks at Group 2 have never let me down before, and I had no reason to start doubting them now.

I must admit, I was curious to see how the springs fit with the numbers and computations I've shown so far. So, I measured the front springs' free length, and punched in the numbers.

Free Length (Lf) = 11 5/16" = 11.3125"

Rearranging terms from the above equation:

Lc = Lf - Fs/k
= 11.3125" - (1879lb / 580lb/in)
= 8.073 inches
= 205 mm

This is very close to the measured spring compressed length of 204mm - almost a dead-on match. This tends to support the analysis and measurements done so far.

At the end of the day, though, these numbers don't mean anything until the car is back on its wheels, and we can measure and test the end result. Once this is done, I'll re-measure everything, and summarize all of this analysis. I guess I should start putting the car together sometime soon...

(Next up: parts get cleaned and painted. Stay tuned.)