Showing posts with label Repairs. Show all posts

Saturday, November 28, 2009

A Hot Detour

So, after reinstalling the carpet, it was time to get back to the original source of trouble - the heater core assembly.

You may recall that I removed the heater core because it was leaking coolant fluid into the pedal area. This is bad - it can lead to my feet getting scalded, but worse, the pedals would get wet and slippery. Not something you want while pressing the brakes to stop and avoid hitting the guy in front...

To repair the leak, I removed the complete heater assembly, and tore it apart. The heater core itself is a small radiator-like heat exchanger, which heats up air with engine coolant. It looked in good shape, but I had it rebuilt and serviced, just in case. I also removed and replaced the valve that controls flow of coolant to the heater core, which is another potential source of leaks.

From Q's House of Speed


As for the rest of the assembly, it is mostly built of plastic, with a pair of metal doors that open and close in order to guide hot air through the heater core, and out to either the car floor (heater mode) or to the front windshield (defrost mode.) A pair of levers control these flaps. Both flaps were rusty, so I cleaned them up and derusted them using Evapo-Rust rust remover. I then applied some primer and a couple of coats of black Rust Oleum spray paint. This should help keep any new rust from developing.

From Q's House of Speed


The top of the box has a rubber gasket that seals and isolates the whole unit. In my case, there was no gasket, so I had to make one of closed-sell foam rubber material. Simple enough.

So, after all this prep work, the box was reassembled, and made ready for installation. The only problem was this: reinstalling the box requires access to bolts that are impossible to reach once the box is in place - unless you remove the dashboard. I also think that, with all the new insulation in place, the carpet is a bit raised, and does not provide enough room for the box to be installed into place - unless you remove the dashboard.

Sigh....

You know where this is going, right?

Sunday, June 7, 2009

Long time, no driving...

It's been almost 6 months since my last post - time flies, doesn't it - and admittedly, I have not made as much progress since then. Yes, the car still is not running, the interior is not done, and there is no sign of having the car running any time soon - just like last time.

But I figured I'd update the blog and show where I'm going.

As you might recall, I needed to repair the heater core, as it was leaking coolant onto the pedal box. To do all this, I gutted out the interior carpetting, center console, and all the insulation associated with it. The plan was as follows:

- replace old/grimy insulation with something newer
- clean carpet and reinstall
- repair heater core and reinstall
- refurbish center console, and reinstall.

Well, I am still stuck in step one - replace insulation.

But before reinstalling the insulation, I had to deal with the bent jacking support, which had bent into the driver side floor pan. I took the car to Group 2, and they basically hammered the floor pan back into shape for me. It is not super strong, but for now, the repair is sufficient. The good news: the rocker/sill is perfectly good and strong, so structurally, the car is in good shape.

So, on to the insulation:

First, I cleaned up all the interior, basically lots of vacuum cleaning and good-ol' water and rags. The hammering of the driver side floor pan left a few spots with no paint, so I covered that area with Wurth Undercoating paint. This helps keep rust at bay, and it even helps with noise deadening! (Not that the localized application helps with that at all.)

Next, I started installing rubberized asphalt + aluminum sheets from B-Quiet over in Canada. Their Extreme product is similar to Dynamat, but at about half the cost. Since I saved so much money (right...) I also purchased their V-Comp product. The asphalt layer helps dampen vibration, while the V-Comp absorbs noise.

Installing the rubberized asphalt sheets is painstaking - a real pain in the butt (and the neck, back, arms, stomach, and legs. Seriously.) It is important to minimize any air pockets left between the sheets and the car body. To accomplish this, I cut lots of smaller pieces (about 6" x 18" sections) and pasted them inside the car. I started around the edges, worked my way up to the firewall, and finished the floor sections last. Using a wooden roller (and its handle for detail work) helps tremendously, but it still takes lots of work. I estimate I spent about 24 labor hours working on this.

A single 50 sq. ft. roll was sufficient for the job. The results look nice (so far.)

And that's all I've done so far.

Next up, I need to install the V-comp product. I ended up buying two 13.5 sq. ft. sheets for this task. This will not provide enough material, but I'll make sure to paste it onto the firewall, and the driver and passenger side floor sections. Any leftover material will be used around the transmission tunnel section, and then on the driveshaft tunnel section. I've already cut the pieces - I made templates out of newspaper, and cut to match - but I have not test-fitted them. I am very curious to see how it all comes out.

A few notes on this whole noise insulation thing:
- Again, this is very tedious work - especially in the cramped confines of my one-car garage. I see these kinds of material installed onto cars on TV shows all the time. They never say how long this takes - now I know why.
- The material is a bit messy - the rubberized asphalt leaves marks all over your clothes, hands, and skin. It's not too bad, but one has to be careful not to stain any parts of the house (e.g. the shower floor) when you are done working. (Don't ask me how I know...)
- The stuff is heavy. I estimate I'll be adding about 60lbs to the total weight of the car. On the plus side, it's fairly low in the car, but still, 60lbs cannot be a good thing.
- And I still don't know how well this stuff works. The GTV is a noisy car by nature, so I might be completely wasting my time with this. We'll find out soon enough.

Next up: A light detour...

Sunday, November 30, 2008

Heating and Cooling - Heater Box Removal

The next thing to do is to remove the heater core. Generally, this tends to be a big pain. You see, removing the heater core involves crawling under the dashboard, usually half upside-down, with very littler room to maneuver, while unfastening nuts and bolts in very tight and hard to reach places. Being a contortionist is not a requirement, but it is very helpful.

On the GTV, the center console must be removed before reaching the heater core. Although this is not difficult, it adds to the amount of work needed to be done. The console contains switches for actuating the wipers, heater fan, and fog lights, as well as a cigarrette lighter. These have wiring that must be disconnected and labeled, making things a bit slower.

Plus, the shift lever sticks right through the middle of the console. Again, adding to the amount of work required.

So, to start, one removes the shifter knob. On this car, the knob is a simple slip-on knob. One then removes a few screws holding the center console in place. This allows the console to be moved around, providing access to the wiring underneath the console itself.

During this whole process, I jiggled the cigarrette lighter and the various switches, just to figure out how to proceed. To my surprise, smoke starting coming out from around the lighter wiring. Holy cow! I pretty much panicked - images of the car burning down my house flashed through my mind. After fumbling for the hood lever, finally finding it and popping the hood, then looking for an unfindable 10mm wrench (is that the right size for the battery terminals?), and realizing this was taking way too much time, I figured I'd try to disconnect the wiring from the lighter itself. With the heating element glowing red, I reached in (half expecting to burn my fingers,) found the wires, and disconnected the lighter plug. Smoke streamed for a few more seconds ("what else is burning?") but then it faded and stopped altogether.

Moral of the story: always disconnect the battery when working with the car!

So, I proceeded to disconnect the battery terminal, and caught my breath. Talk about dodging a potential bullet. This is a lesson that I keep forgetting, and keeps biting me in the butt!

I then detached the wiper, heater, and fog lamp switches from the console. This allowed me to keep everything connected (and functional) while freeing up the center console itself. I also removed the heater temperature control levers and cover plates, and pulled the console out of the way.

At this point, the shift lever sits by itself, covered by two rubber boot. One of the rubber boots is supposed to cover the transmission tunnel, while the other one rests above it. In my car, they were flipped - the lower boot sat on top of the top boot! Removing the boots just involves pulling them out of the shift lever.

On closer inspection, both boots were torn. The bottom one (which should have been on top) was covered in tranny fluid (which explains some of the odors inside the car.) These things will need to be thrown out and replaced.

Once all this is removed, one can tackle the heater box itself.

One starts by removing the two air ducts connecting the heater box to the defrost vents. Each air duct is attached to the heater box by two nuts. Removing them was trivial. So far, so good.


The next thing is to disconnect the heater box from the electrical wiring. Not a big deal, but it requires labeling the wires to make sure we can connect them correctly again.

Next, one disconnects the coolant hoses from the heater box itself. I had already bypassed them, so they were mostly empty, but a bit of coolant dripped from them, nonetheless. These will be replaced with fresh hoses when putting everything back together again.


Next, one needs to unfasten the four nuts that hold the heater box in place. These nuts fasten around four studs connected to the top inside of the dashboard. Needless to say, these things are buried deep within wiring, ducts, and other parts under the dash.

To gain better access, I found it useful to remove the heater valve. After removing the heater valve, access to the two studs on the driver side was tricky, but with some patience, the nuts came out OK.

The two studs on the passenger side were a bit more accessible, but still, unfastening them was slow, patient work.


Once the mounting nuts are removed, the box can be jiggled out of place. However, there is barely enough clearance to pull the box out from under the dashboard. I eventually removed the bottom part of the heater box (the actual heater fan, as it turned out.) This allowed me to remove the box in pieces. This worked OK for now, but in all honesty, I am not sure how I'll put this all together back in place.

Overall, the box looks old and a bit rusty, but very rebuildable. The plastic parts need a good cleaning, but there is no apparent damage to it. The flapper doors (which route air to the floor, or up to the defroster vents) are rusty, but the rubber edge trim on them feels flexible and without any cracks or damage. The box needs cleanup and maybe some paint, but overall, it looks in very good shape.

Another surprise, however: the fan is actually a six-bladed fan. For my model year, the fan should have been a cylindrical "squirrel box" fan. I am not sure how the wrong fan type got in there, or to which car it belongs. It looks like a fan from an older vintage GTV, but I do not know for sure.

After all this, I bagged and labeled all the parts, and put everything away. The car is still driveable, although the transmission boots are missing, allowing noise and air to come through the transmission tunnel.

Next up: Things to buy, parts to repair.

Heating and Cooling - Heater Bypass

So, first, I figured I'd bypass the heater system in order to keep the car running without having coolant sprayed all over my feet. This buys me time to then remove the heater system, restore it, and replace it at a nice, leisurely pace.


First, I got a 10-foot length of heater hose from International Auto Parts. At $2.95 per foot plus shipping/handling, this can be a bit of a pricey option, but I figured I'd get something that works with the car. The ID is 13mm, so looking back, I figure I could source this locally and save on shipping.

The heater core is bypassed by disconnecting it at two places:
1. At the top of the engine, towards the back
2. At the water pump.


In order to avoid spills, I emptied the coolant from the engine. Raise the car high enough to fit a clean 5-gallon paint bucket under the radiator drain spout, open the drain spout, and wait. To hurry things, open the radiator cap.

Once the engine is mostly empty, close the drain spout, then open the two bleeder screws - one on the water pump, the other at the top of the engine (near the thermostat.)

Then, disconnect the coolant hoses at the two spots - at the top/rear of the engine, and at the water pump. Then connect these two places directly with 3" length of coolant hose. Make sure to route the hose away from any moving parts. Since hot coolant will flow through this hose, make sure to keep it away from anything that does not like heat.

Tighten all the various hose clamps, and refill the cooling system. As you refill the cooling system, keep the air bleed screws open until coolant starts seeping out, then replace and tighten.

That's it - it is really that simple.

Test driving the car verified that the coolant ceased to leak inside the car. Good thing. The flip side is that the car gets awfully cold at night, and with winter approaching, this becomes a major issue. But I suspect the car will be parked for most of the winter anyways, and so I will not worry too much about this yet.

Next up: removing the heater core; a few surprises.

Monday, January 14, 2008

Water Works, Part 1

So, I've been out of town a lot over the past six weeks - Thanksgiving, Mexico, and the Xmas Holidays. But I finally got back home a week ago, and decided it was time to work again on the Alfa.

Last time I posted, I had found a water/coolant leak in the car, and decided that I had to either replace the water pump, or maybe just tighten it a bit more. Going over the Previous Owner's receipts, I did not find any evidence of the water pump being replaced when the engine got rebuilt. So, I figured, I might as well pony up $85 and buy a new water pump from Centerline. The thing is back ordered, however, and it will be a week or two more before I get it.

So, I figured, I might as well do a bit of prep work and remove the old pump.

Now, this sounds easier than it is. See, to get to the water pump, you need to remove the engine fan. To get to the engine fan, you need to remove the radiator. And so on -- you get the idea. So, at about 9:30am on Sunday, I marched to the garage, cleaned up a bit, and got to work.

First, I raised the car onto jack stands. This provided a bit of extra access to the front of the engine from the bottom of the car, and allowed me remove the oil sump pan guard grill. See, the bottom of the oil sump rides fairly low on this car, and in order to protect it, the car comes equipped with a metal undertray.


Another part needing a bit of cleanup...

I then flushed the radiator. This is done by reaching under the radiator with a 12mm wrench, and unbolting the drain plug found underneath. Of course, once the plug is gone gravity took over, and a bit of coolant got sprayed all over the garage floor. To my surprise, the fluid came out yellow (as opposed to very tasty/shiny green.) But it came clear enough, with no oil or anything. This is a very encouraging thing.

I ended up draining about 2+ gallons from the engine! For a small motor, there's tons of coolant in there.


Then I removed the front grill of the car. This allows even more access to the water pump assembly from the front of the car without having to remove the hood. This also allows me to really clean up the grill, and make it really shiny and all.


Next, I had to remove the radiator. It quickly became evident that it might be easier to access the various fasteners and hoses attached to the radiator by first removing the car's battery. So, I figured, what's another part? So, I unplugged the wires connecting to the battery, and removed the battery.

This is when I encountered my not-so-good surprise - the plastic tray holding the battery was covered in some sort of gooey slime. Some of it had migrated to the metal tray holding this whole thing in the engine compartment. This is worrysome, as a) gooey stuff coming from batteries tends to be very acidic, b) acidic stuff eats through metal, and c) Alfas tend to have very rust-prone metal to begin with.

Hmmmm....
So, I put on fresh gloves over my dirty gloves, grabbed a rag, and cleaned up as much as I could of the metal tray. I'll have to pour some Baking Soda on the metal tray, too, in order to neutralize the acidity, then rinse the whole thing. For now, though, most of the acid was out of the way. Fortunately, the paint on the tray did not seem to be damaged at all. Good thing there...

I then added to the list of things to do: buy a new battery...

I then moved on to the radiator (finally.) Removal was pretty straight forward: remove two nuts from the top, untie three hoses, then pull the thing straight up. The thing looked a bit dirty, but otherwise in good shape.

Then on to the engine fan. To remove it, you undo five small bolts (10mm?) on the face of the fan itself. Removing the front grill allowed excellent access to the fan itself. Then I loosened up the alternator (19mm wrench, 17mm socket for the main pivot bolt) for added clearance, and removed the fan belt.

By now, I was feeling all confident and happy. I did take my time (about two hours), but I had encountered no show stoppers so far. So I figured, time to remove the water pump.


The water pump is a very annoying thing. To remove it, you need to disconnect three hoses from the pump housing. Upon removing each, a few ounces (maybe a pint) of coolant would start pouring all over the place. Again, this tends to splatter all over the floor, making a mess, and breaking things. Once the hoses are undone, however, it got worse.

There are nine studs sticking out of the timing belt cover that hold the water pump in place. I needed to remove the 10mm nuts fastened to each stud. Although access was a bit tricky, removing the nuts took all of five minutes. However, as I pulled the pump out, the thing did not clear the crank pulley right underneath the pump itself. As it turned out, the two lower studs prevent you from clearing the pump out of the way. I recalled reading about this on the AlfaBB, but I did not understand what folks had referred to. (See picture towards the end, after removing the pump. The bottom two studs are the annoying ones!)

Until now, that is. How freaking annoying! Who comes up with this!?

After perusing the online BBs for about an hour, I found I had two options:
a) remove the studs
b) remove the crank pulley.

To remove a stud, the typical process calls for threading two nuts onto the stud itself, tightening them against each other, then turning the **bottom* nut counterclockwise, with the hope that the now-very-tight nuts will, in turn, rotate the stud out from the timing belt cover. This assumes that there is enough thread on the stud to place the two nuts, and enough room to get two hands to work two wrenches simultaneously.

After trying for about 45 minutes, I realized I could do neither effectively.

How freaking annoying!!

So, time for option B - attack the crank pulley. For this, one needs to source a 38mm socket (some GTV models use a 36mm socket - not mine, though) in order to remove the gigantic nut holding the pulley to the crank. I found one such socket at the local Shucks store for $19. I guess that's one more thing I don't need to buy anymore.

There are two main challenges when removing the nut that holds the crank pulley:
a) As you apply torque to the nut, the engine rotates. After all, you are applying torque to a nut that is tied to the crank itself. And guess what, the crank is supposed to rotate, right?
b) The nut itself is tightened with a lot of torque - 180ft-lbs is the spec. That's a lot of torque!

The trick to solving (B) is easy: grab the biggest breaker bar you can find, and pull on it as hard as you dare. Or even better, buy some air tools and go at it with an impact wrench. I do not have air tools nor impact wrenches, so I had to settle for the breaker bar option.

The trick to solving (A), however, is to shift the transmission into 5th gear, and applying the hand brake. This effectively prevents the engine from turning, as the crank is connected directly to the wheels through the now-engaged transmission. So, I tried that first, and as I pulled on the breaker bar, I came to the realization the parking brake did not work, and the car rolled backwards about six inches.

How freaking annoying!! Another thing I have to fix!
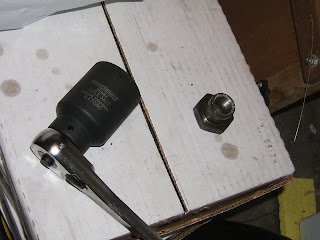
So I chocked the rear wheels with a few 2x6s I had lying around, and tried again. This time around, the car did not move much. At first, the nut did not budge. So, I pulled as hard as I could, and just when I started to think "I must be about to break something", the thing started to give way. A few more tugs, and the nut came loose.

Wee!!!

Once the nut came loose, I tugged on the crank pulley a few times. At first, the thing did not budge. However, a few hard tugs later, the thing came loose. I got lucky - some folks require a bit more light tapping and the such.

Double-wee!!!

I then tugged on the water pump, and the thing came out easily.

Triple-wee!!!

By now, it was 5:30pm. I figured it was time to clean up the garage a bit, gather/organize all the parts I disassembled, and call it a night. I did accomplish the goal for the day. But man, I sure felt I'd be sore the next morning.

So, the car is still dead, with no battery, no water pump, and a few parts removed. I suspect getting all this stuff together again will not take as long, once all the parts are cleaned up and ready to go.

Thursday, November 15, 2007

Work continues: steering linkage, part 2

So, last Saturday I left the car up in stands, with the steering linkage all disassembled, while I waited for the newly-painted steering rods to really dry up. I also wanted to buy new left-hand threaded lock nuts, since the old ones were really beat up. I figured I'd wait until the next weekend to reinstall things and wrap things up for now.

Well, I could not wait.

On Monday, I went to a few local stores in search of the rare left-hand 14mmx1.50 nut. I finally found three at High Strength Bolt Co., in Kent. This was the last pieces I needed, so I was ready to re-install stuff.

Monday night I reassembled the steering links and ball joints, and set them to their original length (which I captured when I was disassembling things last week.) I then crawled under the car, to get everything back together.

Re-installing incurred three main things:
1. Get the ball joints back into the steering knuckles and other locations.
2. Pound them a few times with a rubber mallet, and thread the upper castellated nuts to secure the rods to the suspension.
3. Secure the nuts with wire pins to make sure the nuts don't spin off.

Steps one and two were easy enough - just get things in place, pound, then thread the nuts. Torqueing them correctly required using a few extension bars with my torque wrench, as you must access the nuts from the top of the engine bay. All this was completed in about an hour.

Threading the lock pins in place, though, was another story. First, the castellated nuts had to align with the securing holes on the ball joint stud themselves. This was tricky, since some of the ball joint studs are hard to see from under the car (especially the inner tie rods.) On top of that, the pins I bought were a bit too large, and they would not fit properly. Aargh! After trying for about an hour, I decided to give up, and try again the next day.

So, the next day, I bought thinner pins at the local hardware store. Then under the car, and after about ninety minutes, all the pins were installed and locked in place. Finally. I must say, I see the need for castellated nuts, but I really hate dealing with them.

I then reinstalled the wheels, and took the car for a ride. The steering feels a bit less unresponsive - like there is a bit less play on the steering wheel. This maybe all a placebo effect going on, though. The suspension still creaks and feels weak. But I think there is a bit of an improvement.

Next up will be dealing with the front suspension. I still don't know if I will tackle this myself, or send it to the shop and let them do this. I also need to decide what to do about springs and dampers. I'll have to keep looking around for recommended rates and the such.

Then it's onwards to the rear suspension. I am really thinking I do not want to tackle the rear end at all. It seems dealing with the large and heavy differential requires tons of room, and tons of help. Hmm...

So maybe I'll do the front myself, then go to the shop for the rear end work.

I think I'll be waiting until after Xmas for this, though, as I have a few trips coming up, and very little time to work on the car. Oh well.

Sunday, November 11, 2007

Work continues: steering linkage, part 1

I finally started working on the steering linkage of the Alfa. The idea was to replace just a few things in the front end, and then decide whether I want to tackle the whole job or not. One side of me wants to do all the work, since I find working on cars to be fun - I like the challenge (both mental and physical,) trying to figure things out, and engrossing myself in a task so much that I end up losing track of time (or the real world, for that matter.) And with a bit of luck, you end up with a better working vehicle.

On the other hand, this is the front suspension of the car, which can be pretty complicated stuff. Taking it to a shop will ensure that the work will be done right, and fairly quickly (1-2 days max.) Just drop off the car, come back the next day, and everything is A-OK. There is a lot of benefit in this - just drive the car and have fun.

I am still undecided as to what I will do. But in the meanwhile, I figured replacing all the steering ball joints should be straightforward enough.

So, last Wednesday night I jacked up the front end of the car, placed it on stands (ratchet-type jack stands), and went to work. I had borrowed a gear puller from my friend TJ (the puller on the left,) and was able to pull three of the six ball joints required. This puller worked well, but it was a very tight fit for the inner tie rods (four of them). I spent two and a half hours trying to figure things out! At this pace, I would be done sometime around Xmas.

So, I stopped for the night (11:30pm) and decided to look for the puller on the right (called a "ball joint lifter" - not a puller.) A few folks in the Alfa Bulletin Boards (www.alfabb.com) have recommended this type, and a few stores had them online. But I wanted it now, so I ended up going to Napa Auto Parts, and wouldn't you know it, they had it in stock. It only cost $12 with tax, so I figured I'd give it a shot.

So, Saturday morning, I got under the car at about 9am or so. Within 30 minutes all three remaining ball joints had been pulled off. Wee! I must say, having the right tool for a job saves a lot of time and effort. I highly recommend obtaining this kind of lifter for this kind of job, as it made the whole ball joint pulling (lifting?) experience a very simple one.

So, finally, the steering linkage was all out. I left the steering box and idler box in place, as I think servicing these are a bit beyond the immediate scope of things. I suspect the steering box could use a bit of maintenance, but for now, I'll just play with one thing at a time.

Before disassembling anything else, I measured the distance between ball joints, so that I can reset the length when I reassemble the whole thing. I'll have to align the car regardless, but hopefully the front alignment will be within a reasonable ballpark in the interim (what's a bit extra tire wear?)

The next problem was disconnecting the tie rods from the main rods themselves. At first I thought the locking nuts where part of the middle rods themselves. After much pounding at wrenches and the such, I realized the nuts and the rods were separate parts. Duh! They are locking nuts, after all. So I started pounding in different directions, and within 10 minutes, everything was disconnected.

The joints themselves were to be thrown out, but the middle rods themselves will be reused. They were all grimy with grease, undercoating, paint, and rust. So I figured I'd clean them up and paint them.

I started by cleaning the rods with brake cleaner and a stiff wire brush. After about 1o minutes of scraping away, the things were fairly clean. Brake cleaner is nasty stuff, but it does clean everything in sight. I then sanded the rods with medium grit sandpaper, and re-sprayed with even more brake cleaner.

Afterwards, I rinsed everything with hand clener (Fast Orange) and plenty of water.

The results are shown on this picture. One of the rods was pretty much striped down to bare metal. The other two were down to the original paint (?) with some spots of bare metal. All signs of grease and undercoating was gone, as well as most of the rust.


I then painted the rods with a few light coats of Rust-Oleum Semi Gloss paint. The things look pretty nice now - not bad for the first time I've ever spray painted anything in my life. The whole paint work (prep, and painting itself) took about 45 minutes.

I would have done a few things differently:
a) I would have used a finer grit sandpaper, as the finished surface looks a bit rough, and not shiny smooth.
b) I would have used a full-gloss paint. I am realizing I want the suspension to be glossy and shiny.

Before re-installing all this back onto the car, I want to replace the lock nuts used to lock the rods and the ball joint links together. I abused the crap out of them when I was removing them earlier, so I figured it would be better to replace them. The lock nuts are sized 14mm x 1.50 thread pitch (for those keeping score at home,) but I need both right-handed and left-handed thread nuts. I did find the RH type at the hardware store down the street, but they did not stock the LH kind. I will be looking for the LH nuts during the week.

Once I find them, then I can re-install the tie rods to the main rods, then install stuff back onto the car. Hopefully the car will be back on its feet next weekend. We'll see how that goes.


Friday, November 9, 2007

Repairs and updates begin - master brake cylinder

So, the first thing I did when I purchased the car a few weeks ago was drive it straight to the local Alfa shop, Group 2 Motorsports. They are up in the Magnolia district of Seattle. They are very knowledgeable, and very friendly. It is truly a joy to stop by there and chat with the shop's owner, Joe, and the rest of the gang (Keith, Chris, et. al.)

I figured I'd show up, show off the car, and make an appointment to have the car inspected. However, within five minutes, Keith was test driving the car, placing it on a lift, and looking all over. Within half an hour he pointed out things to fix on the car.


The first thing was the brake master cylinder. The thing was leaking, and so the brakes felt mushy and not very strong. They were OK to drive home, but Keith recommended not to drive the car much until the thing was fixed.


So, I made an appointment, and the following week, I replaced the old master cylinder with a new set. The brakes don't leak anymore, and the car stops. One thing down, a few hundred little things to go.